profile-filament-plugin
Pages
Security
On this page
Introduction
The Security profile page provides a UI for a user to update their password, as well as managing a user's available two-factor methods.
Each of the components on this page can be customized and swapped out for your own implementations. See Swap Components for more information on how to do that.
If you're looking to remove a certain component from the page, check out the Available Features documentation for more information on how to remove each of them.
Most of the translations for this page are located in the pages/security.php and pages/mfa.php language files.
Update Password
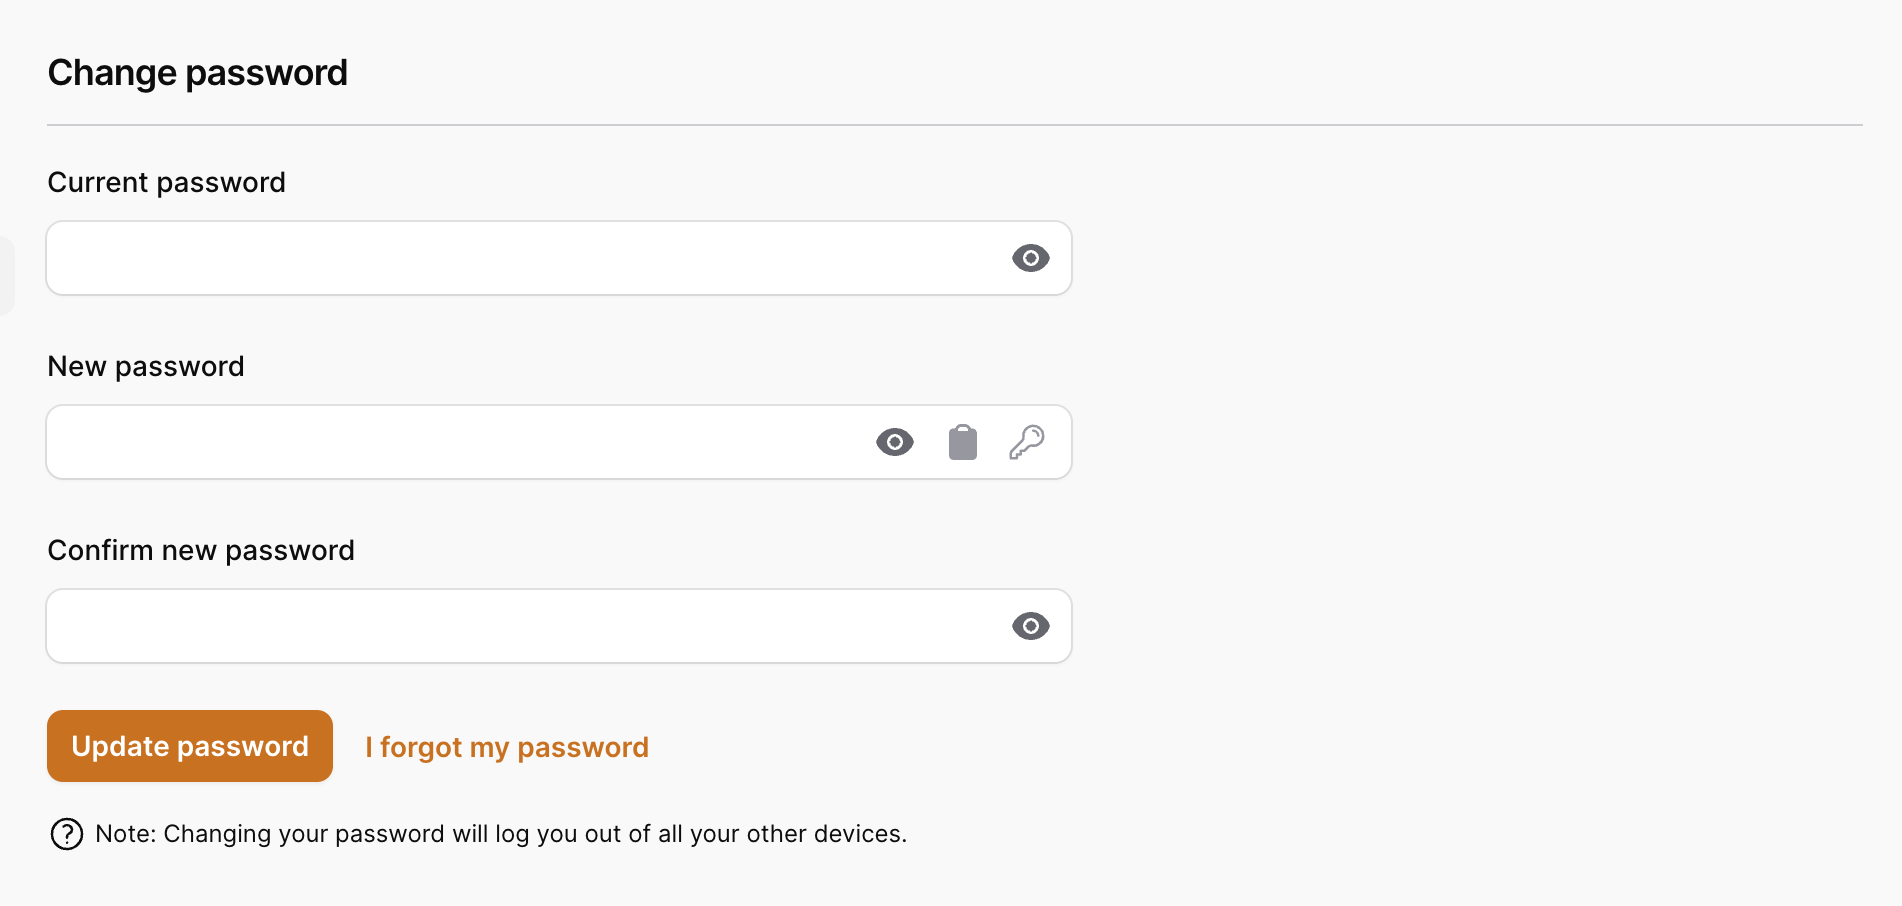
The Update Password component provides a simple form for your users to update their current password. By default, we require a user to confirm their current password, as well as re-entering the new password as a confirmation. Both of these fields can be removed from the form if desired.
Here is a screenshot of the default update password form:
Events
The UpdatePasswordAction provided by this package will dispatch the UserPasswordWasUpdated event, which will receive the authenticated user. You can listen for this event in your application to send an email notification to a user when their password is updated, for example.
Password Hashing
By default, we assume your user model is using the hashed attribute cast on your user's password field, so we will not hash the new password for you. If you're not using the hashed attribute cast, you will need to modify the config value like this:
// config/profile-filament.php

'hash_user_passwords' => true,
Customization
There are several ways you can customize the update password form. In this section we'll go over some of the ways you can accomplish this.
Current Password Field
If you don't want your users to have to enter their current password, you can remove the field when you register the plugin:
use Rawilk\ProfileFilament\Features;
use Rawilk\ProfileFilament\ProfileFilamentPlugin;

$panel->plugin(
    ProfileFilamentPlugin::make()
        ->features(
            Features::defaults()->requireCurrentPasswordToUpdatePassword(false)
        )
)
Password Confirmation Field
If you don't want your users to have to enter a password confirmation, you can remove the field when you register the plugin:
use Rawilk\ProfileFilament\Features;
use Rawilk\ProfileFilament\ProfileFilamentPlugin;

$panel->plugin(
    ProfileFilamentPlugin::make()
        ->features(
            Features::defaults()->requirePasswordConfirmationToUpdatePassword(false)
        )
)
Action
You can override our UpdatePasswordAction with your own if you need to. Here is a quick example of how you could do that:
namespace App\Actions;

use Rawilk\ProfileFilament\Actions\UpdatePasswordAction;
use Illuminate\Contracts\Auth\Authenticatable as User;

class CustomUpdatePasswordAction extends UpdatePasswordAction
{
    public function __invoke(User $user, string $newPassword): void
    {
        // ...
    }
}
To use your new action, register it in the config:
// config/profile-filament.php

'actions' => [
    'update_password' => \App\Actions\CustomUpdatePasswordAction::class,
],
Two-Factor Authentication
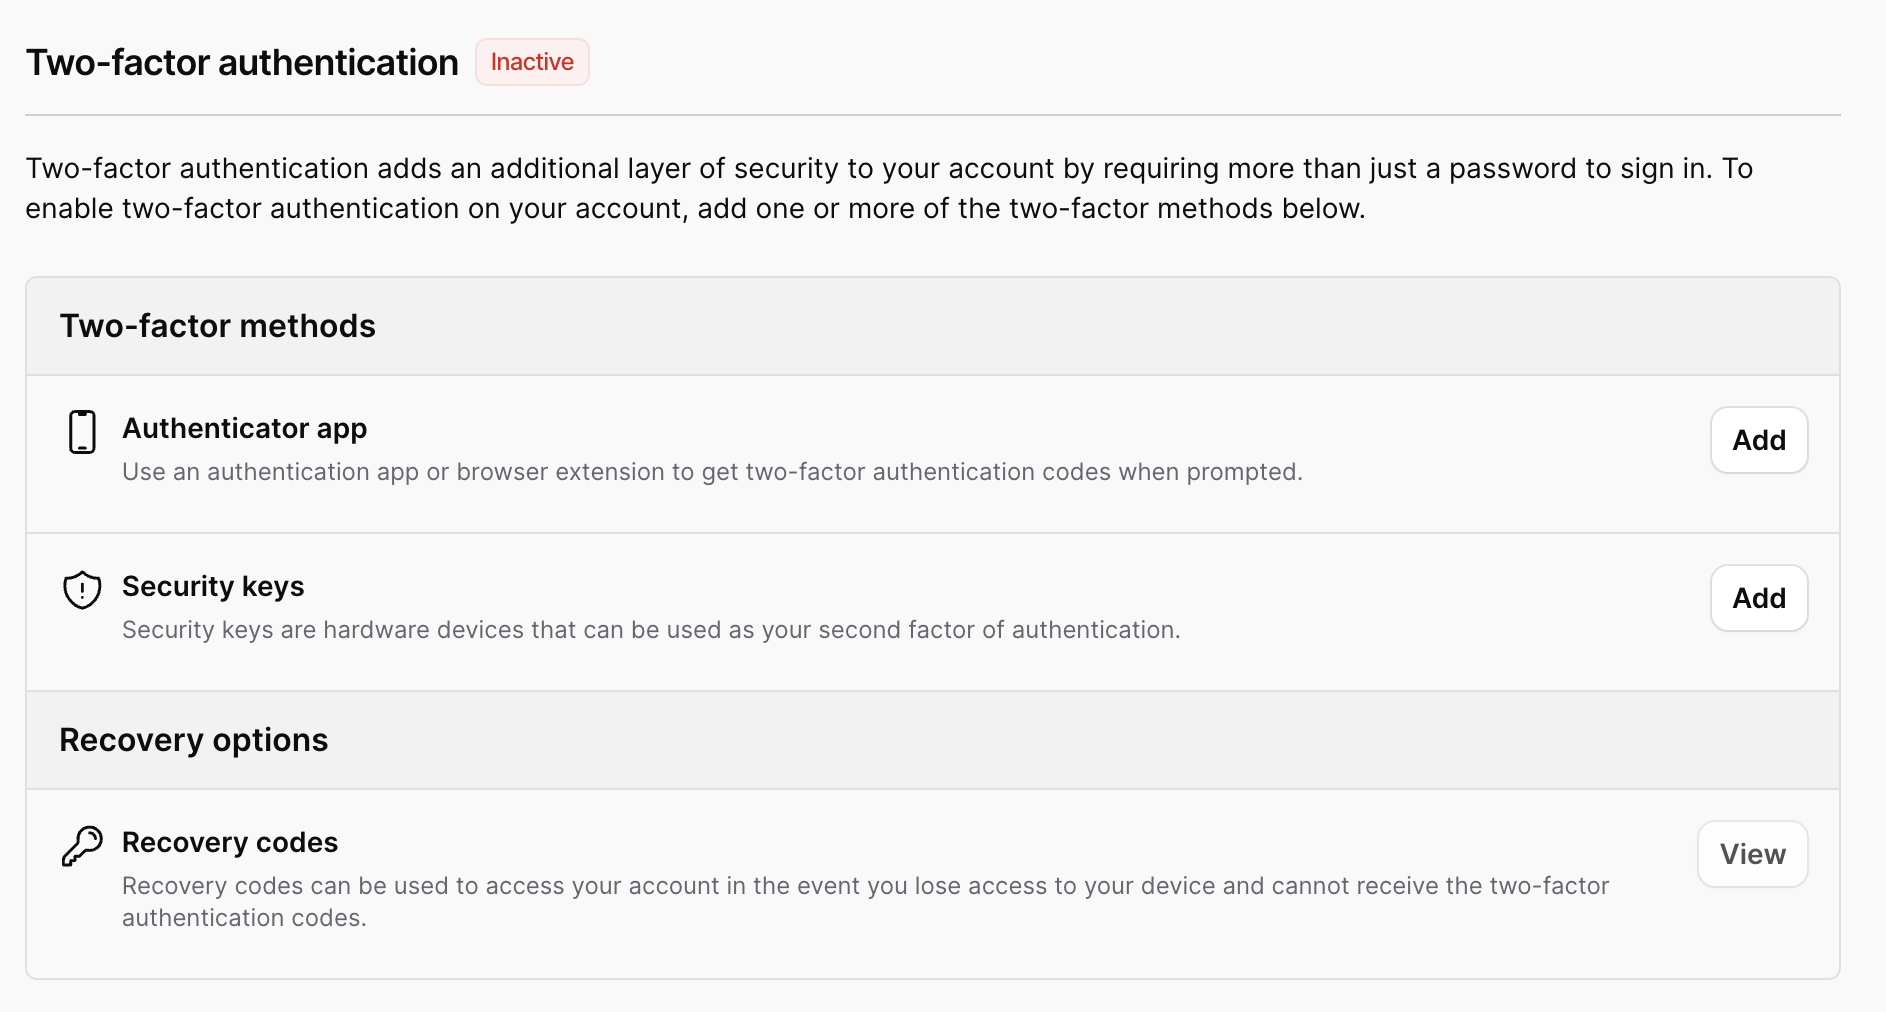
The Two-Factor authentication section allows a user to add either an authenticator app (totp) or webauthn (security) keys as second factors to authenticate. Once at least one second factor has been registered, recovery codes will be generated for a user, which they can then store in a safe place.
Here is a screenshot of the base state of this section:
Authenticator Apps
Authenticator apps are used to generate one-time passwords (totp) that are used as a second factor to verify a user's identity during sign-in. Here is a screenshot of the form used to register an authenticator app. When Sudo Mode is enabled, we will prompt for identity verification prior to showing the registration form.
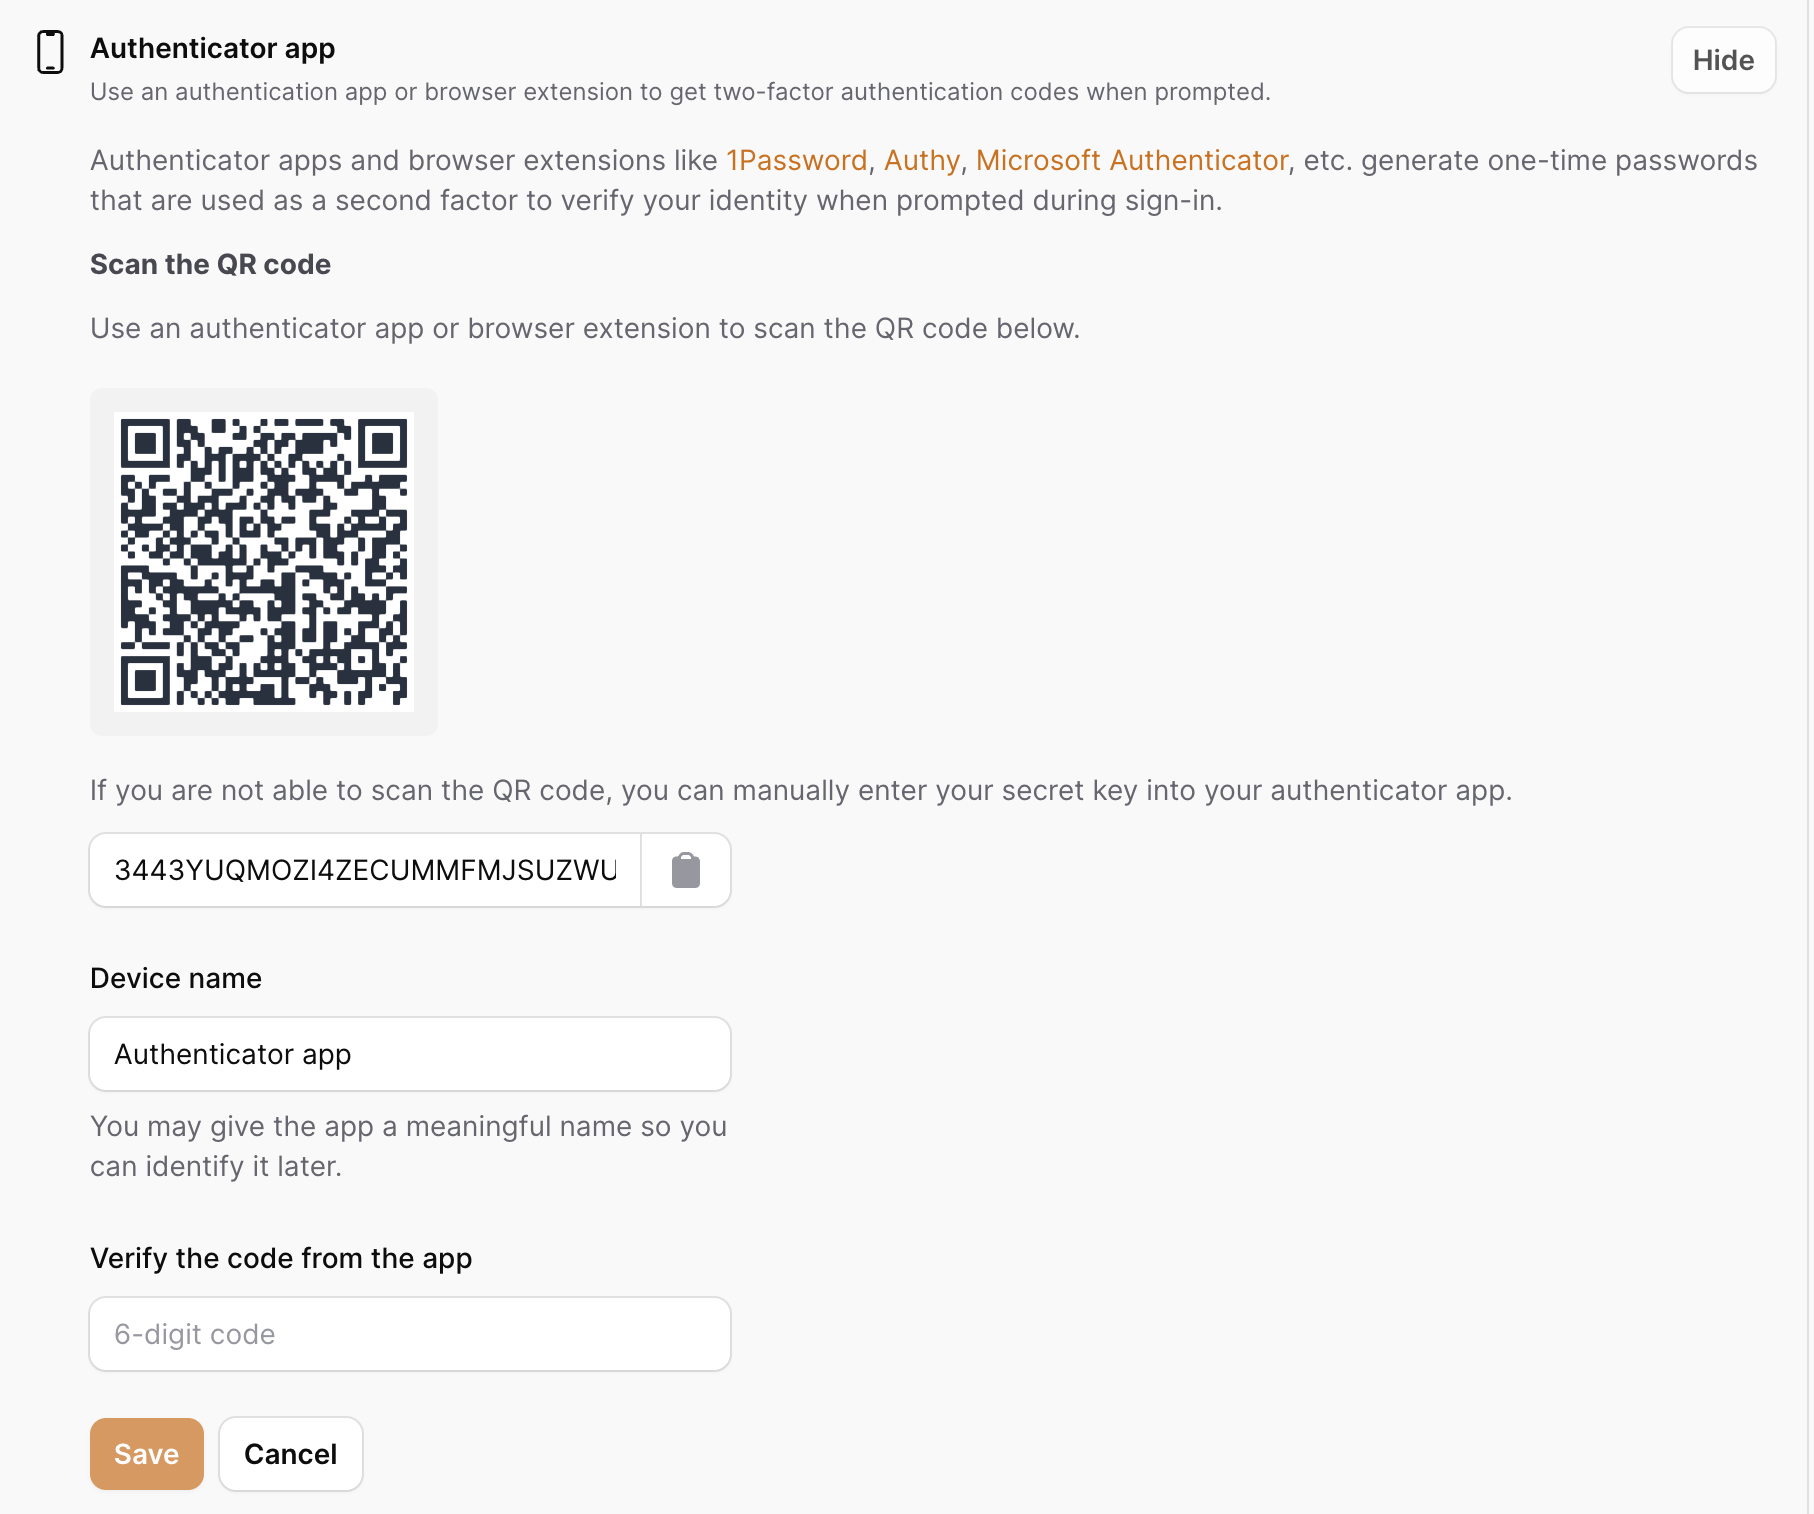
When an authenticator app is successfully registered, we will dispatch the TwoFactorAppAdded event from the ConfirmTwoFactorAppAction, which will receive the user and new authenticator app model instance. You may choose to listen for this event to alert a user when a new totp app is registered on their account.
We will also mark mfa as enabled on the user if it isn't already, and then also generate a set of Recovery Codes for the user.
Customize Confirm Action
If you want more control over how an authenticator app is stored, you may override the ConfirmTwoFactorAppAction:
namespace App\Actions;

use Rawilk\ProfileFilament\Actions\AuthenticatorApps\ConfirmTwoFactorAppAction;
use Illuminate\Contracts\Auth\Authenticatable as User;

class CustomConfirmAction extends ConfirmTwoFactorAppAction
{
    public function __invoke(User $user, string $name, string $secret)
    {
        // ...
    }
}
Now you just need to register the action in the config:
// config/profile-filament.php

'actions' => [
    'confirm_authenticator_app' => \App\Actions\CustomConfirmAction::class,
],
{note} If you use a custom confirm action, you will need to make sure you either call the
MarkTwoFactorEnabledActionclass yourself, or enable mfa manually yourself on the user model.
Deleting Authenticators
When an authenticator app is deleted, we will dispatch the TwoFactorAppRemoved event from our DeleteTwoFactorAppAction, which will receive the authenticator app being deleted. You can in turn listen for this event and send an alert to your users when this happens if you need to.
We will also call the MarkTwoFactorDisabledAction, which will disable mfa for a user if they have no other available mfa methods registered to their account. If you override the delete action, you will need to manually disable mfa for your user. Here is a simple example of how you can override this action.
namespace App\Actions;

use Rawilk\ProfileFilament\Models\AuthenticatorApp;
use Rawilk\ProfileFilament\Actions\AuthenticatorApps\DeleteTwoFactorAppAction;
use Rawilk\ProfileFilament\Contracts\TwoFactor\MarkTwoFactorDisabledAction;

class CustomDeleteAction extends DeleteAuthenticatorAppAction
{
    public function __invoke(AuthenticatorApp $authenticatorApp): void
    {
        // ...

        app(MarkTwoFactorDisabledAction::class)($authenticatorApp->user);
    }
}
Now you just need to register the action in the config:
// config/profile-filament.php

'actions' => [
    'delete_authenticator_app' => \App\Actions\CustomDeleteAction::class,
],
Webauthn
Webauthn (security) keys are typically hardware devices that can be used a second factor of authentication. There is typically a lot of boilerplate code that is required for registering and authenticating with webauthn keys, but this package takes care of most of the heavy lifting for you. See Webauthn for more information on customizing webauthn in your application.
Also, be sure you have the webauthn public key generation routes registered in your app. See Routes for more information.
Since this is a sensitive action, we will require a sudo mode prompt before the registration form is shown.
Here is a screenshot of what the registration form will look like for a webauthn key.

We will ask for a name for the new key, and then when "Add" is clicked, the security key prompt from the browser will open. Depending on your device's capabilities, you should see a prompt similar to this:
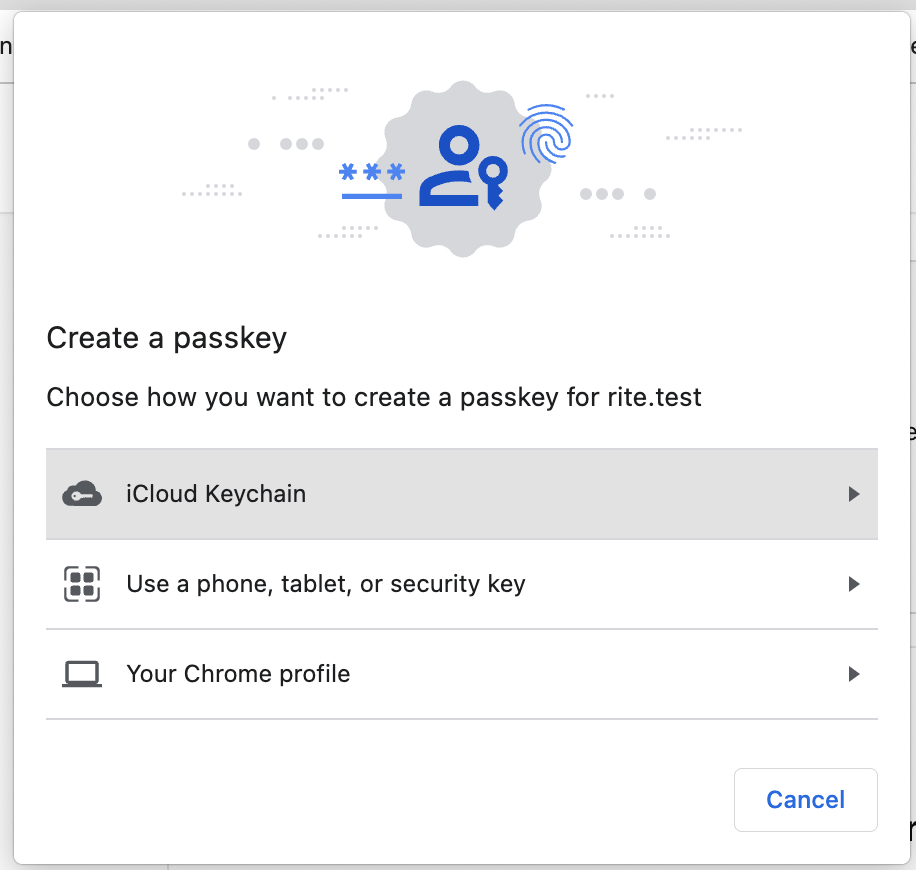
When a webauthn key is registered, we will dispatch the WebauthnKeyRegistered event from our RegisterWebauthnKeyAction, which will receive the user and webauthn key being registered. You may choose to listen to this event, so you can alert your users when a new key is registered to their account.
We will also mark mfa as enabled on the user with the MarkTwoFactorEnabledAction, and generate recovery codes for the user if they don't already have them.
Customize Register Action
Although not recommended, you may override the RegisterWebauthnKeyAction to change how webauthn keys are registered in your application. Here is a simple example of how you could override it, along with the code from our action class that is required to store the key.
namespace App\Actions;

use Rawilk\ProfileFilament\Actions\Webauthn\RegisterWebauthnKeyAction;
use Rawilk\ProfileFilament\Contracts\TwoFactor\MarkTwoFactorEnabledAction;
use Webauthn\PublicKeyCredentialSource;
use Illuminate\Contracts\Auth\Authenticatable as User;
use Illuminate\Support\Arr;
use Rawilk\ProfileFilament\Models\WebauthnKey;
use Rawilk\ProfileFilament\Events\Webauthn\WebauthnKeyRegistered;

class CustomRegisterWebauthnAction extends RegisterWebauthnKeyAction
{
    public function __invoke(
        User $user,
        PublicKeyCredentialSource $publicKeyCredentialSource,
        array $attestation,
        string $keyName,
    ): WebauthnKey {
        $webauthnKey = WebauthnKey::fromPublicKeyCredentialSource(
            source: $publicKeyCredentialSource,
            user: $user,
            keyName: $keyName,
            attachmentType: Arr::get($attestation, 'authenticatorAttachment'),
        );

        return tap($webauthnKey, function (WebauthnKey $webauthnKey) use ($user) {
            $webauthnKey->save();

            app(MarkTwoFactorEnabledAction::class)($user);

            WebauthnKeyRegistered::dispatch($webauthnKey, $user);
        });
    }
}
Now you just need to register your action in the config:
// config/profile-filament.php

'actions' => [
    'register_webauthn_key' => \App\Actions\CustomRegisterWebauthnAction::class,
],
Deleting Webauthn Keys
When a webauthn key is deleted, we will dispatch the WebauthnKeyDeleted event from our DeleteWebauthnKeyAction, which will receive the webauthn key being deleted, and the user. You may choose to listen to this event, so you can alert users when a key is deleted from their account.
We will also disable mfa and remove a user's recovery codes if they have no other mfa methods registered to their account.
Here is a simple example of how you could override our DeleteWebauthnKeyAction with your own implementation; just remember to also disable mfa for a user if you're overriding it.
namespace App\Actions;

use Rawilk\ProfileFilament\Actions\Webauthn\DeleteWebauthnKeyAction;
use Rawilk\ProfileFilament\Models\WebauthnKey;
use Rawilk\ProfileFilament\Contracts\TwoFactor\MarkTwoFactorDisabledAction;

class CustomDeleteWebauthnKeyAction extends DeleteWebauthnKeyAction
{
    public function __invoke(WebauthnKey $webauthnKey): void
    {
        // ...

        app(MarkTwoFactorDisabledAction::class)($webauthnKey->user);
    }
}
Now you just need to register your action in the config:
// config/profile-filament.php

'actions' => [
    'delete_webauthn_key' => \App\Actions\CustomDeleteWebauthnKeyAction::class,
],
Upgrading To Passkeys
When you have Passkeys enabled, and a webauthn key is a platform key (i.e. touch id on an iphone), it can be upgraded to a passkey, which can be used for userless authentication.
Sudo mode is required (when enabled) to perform this action. Here is a screenshot of the prompt you will receive for this action:
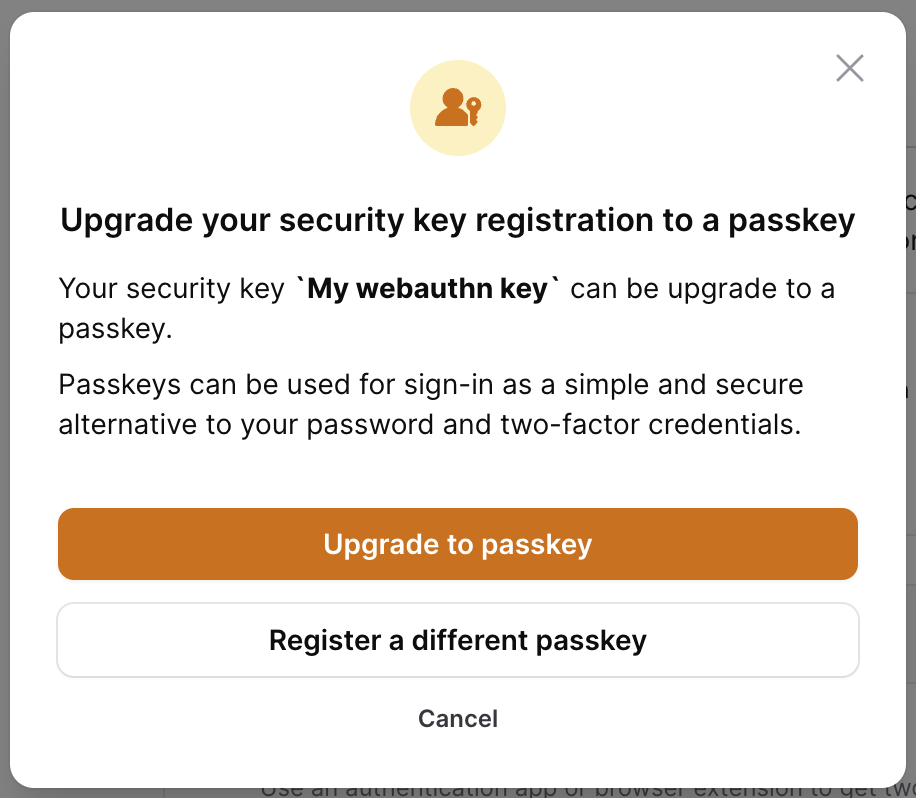
Once the "Upgrade to passkey" button is clicked, you will receive the same prompt from the browser that you received when the key was first registered. When the passkey has been registered, we will dispatch the WebauthnKeyUpgradeToPasskey event from our UpgradeToPasskeyAction, which will receive the user, the newly created passkey, and the webauthn key that was upgraded.
{note} We delete the webauthn key model record that is being upgraded by default.
Although we don't recommend it, here is a way you can override the upgrade action class. The code shown here is what is used in our action class.
namespace App\Actions;

use Illuminate\Support\Arr;
use Illuminate\Contracts\Auth\Authenticatable as User;
use Rawilk\ProfileFilament\Actions\Passkeys\UpgradeToPasskeyAction;
use Rawilk\ProfileFilament\Models\WebauthnKey;
use Rawilk\ProfileFilament\Events\Webauthn\WebauthnKeyUpgradeToPasskey;
use Webauthn\PublicKeyCredentialSource;

class CustomPasskeyUpgradeAction extends UpgradeToPasskeyAction
{
    public function __invoke(
        User $user,
        PublicKeyCredentialSource $publicKeyCredentialSource,
        array $attestation,
        WebauthnKey $webauthnKey,
    ): WebauthnKey {
        $passkey = WebauthnKey::fromPublicKeyCredentialSource(
            source: $publicKeyCredentialSource,
            user: $user,
            keyName: $webauthnKey->name,
            attachmentType: Arr::get($attestation, 'authenticatorAttachment'),
        );

        return tap($passkey, function (WebauthnKey $passkey) use ($webauthnKey, $user) {
            $passkey->is_passkey = true;
            $passkey->save();

            $webauthnKey->delete();

            cache()->forget($user::hasPasskeysCacheKey($user));

            WebauthnKeyUpgradeToPasskey::dispatch($user, $passkey, $webauthnKey);
        });
    }
}
Now you just need to register your action in the config:
// config/profile-filament.php

'actions' => [
    'upgrade_to_passkey' => \App\Actions\CustomPasskeyUpgradeAction::class,
],
Recovery Codes
Recovery codes can be used as a last resort for a user to authenticate into their account when they lose access to one of their registered mfa methods. We will generate recovery codes automatically when an authenticator app, webauthn key, or passkey is registered for a user, using our MarkTwoFactorEnabledAction. This action will not do anything if the user already has mfa enabled on their account.
When recovery codes are viewed, we will dispatch the RecoveryCodesViewed event, which will receive the authenticated user. If you need to do any logging or notifications for this, you may listen for this event in your application.
Viewing the recovery codes is considered a sensitive action, so sudo mode is required (when enabled) to view them. Here is a screenshot of what the UI looks like when you're viewing them:
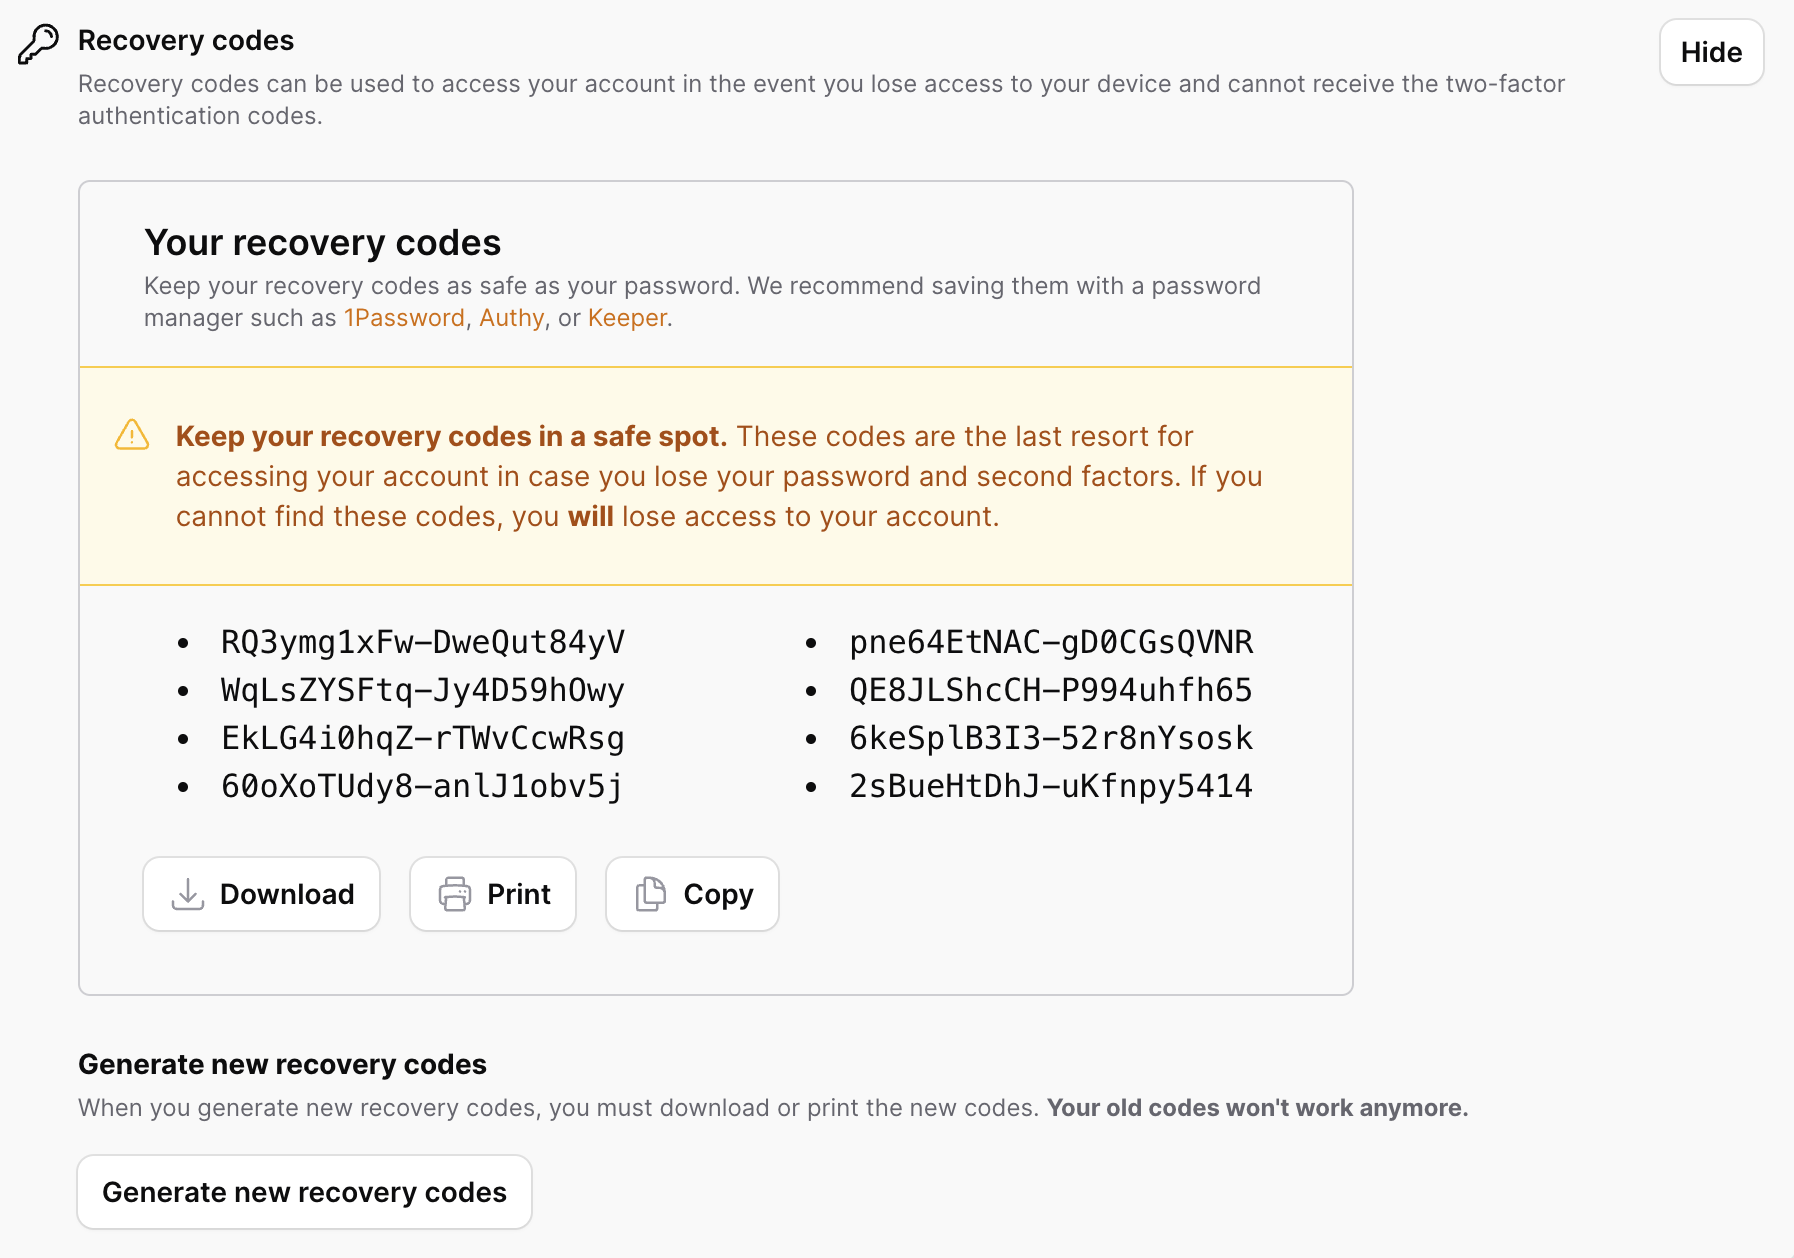
For convenience, we include actions to:
- Download a text file of the codes
- Print the codes
- Copy the codes to clipboard
Code Regeneration
If a user needs to, they can generate a new set of codes. This can be useful if they believe their account has been compromised.
{tip} When a recovery code is used for authentication, we will automatically replace the used code with a new one.
When new recovery codes are generated, we will dispatch the RecoveryCodesRegenerated event from our GenerateNewRecoveryCodesAction, which will receive the authenticated user.
Here is an example of how you can override the action if you need to in your application:
namespace App\Actions;

use Illuminate\Contracts\Auth\Authenticatable as User;
use Illuminate\Support\Facades\Crypt;
use Illuminate\Support\Collection;
use Rawilk\ProfileFilament\Actions\TwoFactor\GenerateNewRecoveryCodesAction;
use Rawilk\ProfileFilament\Events\RecoveryCodesRegenerated;
use Rawilk\ProfileFilament\Support\RecoveryCode;

class CustomRecoveryCodeGeneration extends GenerateNewRecoveryCodesAction
{
    public function __invoke(User $user): void
    {
        $user->fill([
            'two_factor_recovery_codes' => Crypt::encryptString(
                Collection::times(8, fn () => RecoveryCode::generate())->toJson()
            ),
        ])->save();

        RecoveryCodesRegenerated::dispatch($user);
    }
}
Now you just need to register your action in the config:
// config/profile-filament.php

'actions' => [
    'generate_new_recovery_codes' => \App\Actions\CustomRecoveryCodesGeneration::class,
],
If you just want to change how recovery codes are generated, you could alternatively register a callback function on the RecoveryCode class in a service provider:
use Rawilk\ProfileFilament\Support\RecoveryCode;
use Illuminate\Support\Str;

RecoveryCode::generateCodesUsing(fn (): string => Str::random());
Passkeys
The Passkeys section allows a user to register a Passkey. Passkeys can be used as an alternative to two-factor authentication. Two-factor authentication is still required to be enabled for passkeys, however, since we need to generate recovery codes for a user.
Here is what the UI will look like when a user has no passkeys registered to them yet:
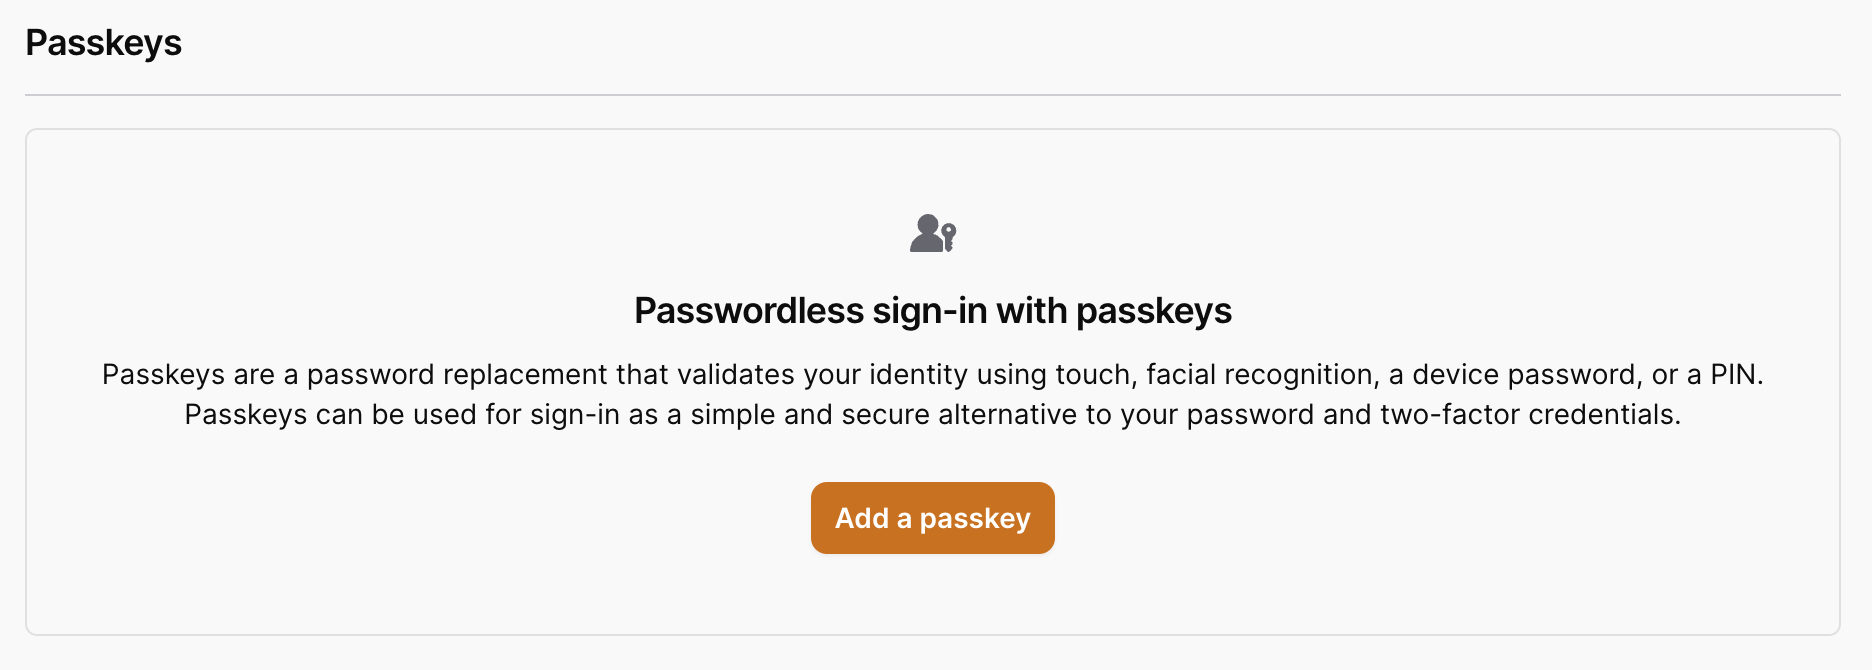
When a user has passkeys registered to them, the UI will look like this:

The registration process is very similar to registering a webauthn key, except that we display the form in a modal instead, and only platform authenticators are allowed. This means that roaming authenticators, like YubiKeys or other hardware keys cannot be used as a passkey.
Here is a screenshot of the passkey registration form:
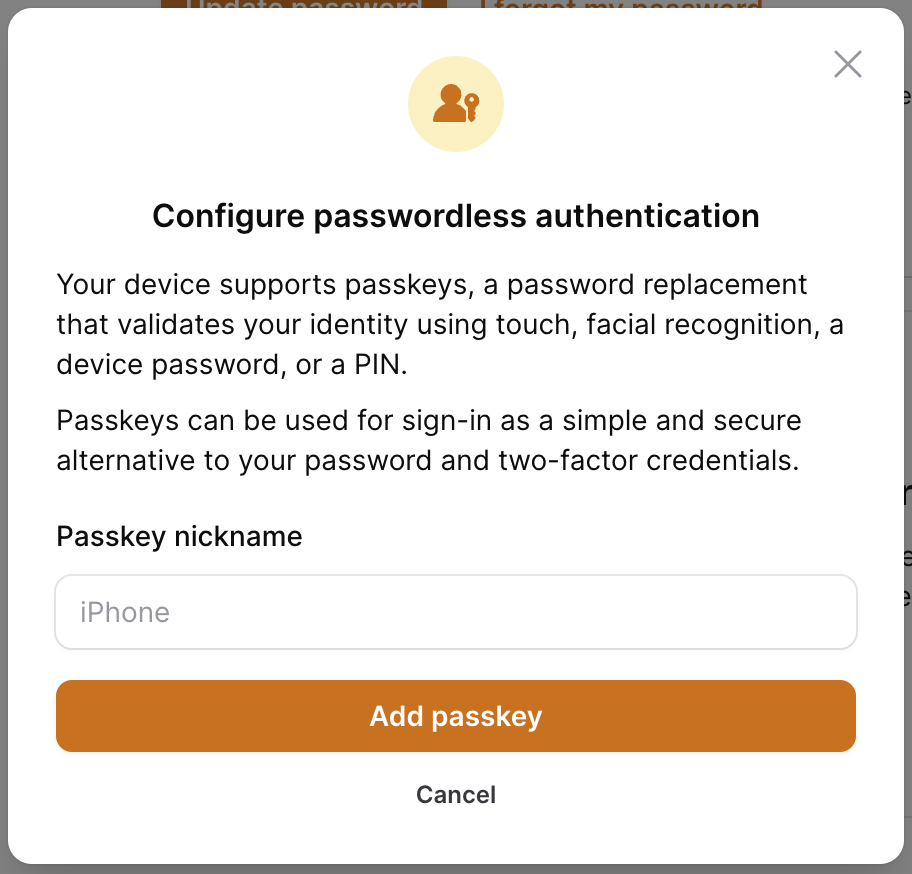
When a passkey is registered, we will dispatch the PasskeyRegistered from our RegisterPasskeyAction, which will receive the passkey and the user. You may listen for this event to alert users of new passkeys registered on their account.
We will also enable mfa for the user and generate recovery codes for them if they don't already have them using our MarkTwoFactorEnabledAction.
Customize Passkey Registration
Although we don't recommend overriding the action, here is an example of how you can do it. The code shown in the example is taken from our action class.
namespace App\Actions;

use Illuminate\Contracts\Auth\Authenticatable as User;
use Illuminate\Support\Arr;
use Rawilk\ProfileFilament\Actions\Passkeys\RegisterPasskeyAction;
use Rawilk\ProfileFilament\Contracts\TwoFactor\MarkTwoFactorEnabledAction;
use Rawilk\ProfileFilament\Events\Passkeys\PasskeyRegistered;
use Rawilk\ProfileFilament\Models\WebauthnKey;
use Webauthn\PublicKeyCredentialSource;

class CustomPasskeyRegistration extends RegisterPasskeyAction
{
    public function __invoke(
        User $user,
        PublicKeyCredentialSource $publicKeyCredentialSource,
        array $attestation,
        string $keyName,
    ): WebauthnKey {
        $passkey = WebauthnKey::fromPublicKeyCredentialSource(
            source: $publicKeyCredentialSource,
            user: $user,
            keyName: $keyName,
            attachmentType: Arr::get($attestation, 'authenticatorAttachment'),
        );

        return tap($passkey, function (WebauthnKey $passkey) use ($user) {
            $passkey->is_passkey = true;
            $passkey->save();

            cache()->forget($user::hasPasskeysCacheKey($user));

            app(MarkTwoFactorEnabledAction::class)($user);

            PasskeyRegistered::dispatch($passkey, $user);
        });
    }
}
Now you just need to register your action in the config:
// config/profile-filament.php

'actions' => [
    'register_passkey' => \App\Actions\CustomPasskeyRegistration::class,
],
Passkey Deletion
When a passkey is deleted, we will dispatch the PasskeyDeleted event from our DeletePasskeyAction, which will receive the passkey and authenticated user. You may listen for this event to alert users of passkeys being removed from their account.
Since this is a sensitive action, sudo mode is also required when you have it enabled.
We will also disable mfa for the user if they have no other mfa methods registered to their account.
Here is an example of how you can override the DeletePasskeyAction if you need to in your application:
namespace App\Actions;

use Rawilk\ProfileFilament\Actions\Passkeys\DeletePasskeyAction;
use Rawilk\ProfileFilament\Contracts\TwoFactor\MarkTwoFactorDisabledAction;
use Rawilk\ProfileFilament\Models\WebauthnKey;

class CustomPasskeyDeletion extends DeletePasskeyAction
{
    public function __invoke(WebauthnKey $passkey): void
    {
        // ...

        app(MarkTwoFactorDisabledAction::class)($passkey->user);
    }
}
Now you just need to register your action in the config:
// config/profile-filament.php

'actions' => [
    'delete_passkey' => \App\Actions\CustomPasskeyDeletion::class,
],
Custom Content
For convenience, we've included some render hooks in the mfa overview section to allow you to add in custom content as necessary. One example of needing the render hooks could be to insert a form for a user to choose their preferred mfa method. You can make use of the render hooks instead of completely overriding our views to accomplish this. Here are the render hooks available on this page:
-
profile-filament::mfa.settings.before: This will render your view in the two-factor authentication section right before the two-factor methods are listed. -
profile-filament::mfa.methods.after: This will render your view right before the recovery codes section. Useful for adding additional mfa methods (note: this is not officially supported at this time, and may require additional work on your part to make it work correctly)
For more information on render hooks, see: https://filamentphp.com/docs/3.x/support/render-hooks