profile-filament-plugin
Advanced Usage
Mfa
On this page
- Introduction
- Requirements
- Authentication Options
- Mfa Challenge
- Webauthn
- Passkeys
- Preferred Mfa Method
- Changing When MFA is Enforced
Introduction
Multi-factor authentication (mfa) is used as a second factor of authentication for verifying a user's identity. Out-of-the-box, this package offers authenticator apps (totp) and webauthn/passkeys as a second factor, as well as recovery codes as a recovery mechanism.
If you're looking to customize the registration process for each method, please see the Security documentation.
Requirements
The following package migrations will need to be run for two-factor authentication:
add_two_factor_to_users_tablecreate_authenticator_apps_tablecreate_webauthn_keys_table
See Migrations for more information.
Your user model will also need to use the TwoFactorAuthenticatable trait:
use Rawilk\ProfileFilament\Concerns\TwoFactorAuthenticatable;

class User extends BaseUser
{
    use TwoFactorAuthenticatable;
    // ...
}
Webauthn Requirements
If you want to use Webauthn, you'll also need to register the webauthn routes in one of your route files:
// routes/web.php

Route::webauthn();
Our macro also accepts parameters to customize the url paths, as well as the middleware being applied to the routes. We don't recommend changing the middleware applied to the routes, but it is possible if necessary. Another way to add your own middleware is to just wrap the route macro in your own route group.
// Available parameters with their defaults
Route::webauthn(
    prefix: 'sessions/webauthn',
    assertionMiddleware: [\Illuminate\Routing\Middleware\ValidateSignature::class],
    attestationMiddleware: [\Illuminate\Auth\Middleware\Authenticate::class],
);

// Wrapping in your own group
Route::middleware(['your middleware'])->prefix('your-prefix')->group(function () {
    Route::webauthn();
});
{note} Do not prefix the route names with
as(...), otherwise our calls to the named routes won't work.
{note} These routes require sessions to work properly, so make sure your routes file has the
webmiddleware group applied to it.
Authentication Options
Middleware
For the least amount of work, you can use our RequiresTwoFactorAuthentication middleware to enforce two-factor authentication for you. This middleware is applied to your panels by default from the plugin. The user will be logged in to the application, however they will be forced to complete the two-factor challenge before doing anything else in the panel.
Custom Authentication Workflow
While the middleware option may be acceptable in some applications, you may not want the user to actually be logged in before they confirm their identity with mfa. We recommend using this approach, however it will take a little more work to implement.
First, tell the plugin not to use the middleware when registering it:
use Rawilk\ProfileFilament\ProfileFilamentPlugin;

$panel->plugin(
    ProfileFilamentPlugin::make()
        ->useMfaMiddleware(false)
)
You will need to override the panel's login page, so you can use your own authentication flow.
$panel->login(YourLoginPage::class)->plugin(...);
You will need to override the authenticate method in your custom page, so it will not log the user in if they have two factor enabled on their account. Here is an extremely simplified example, however you will need to modify it to meet your application's requirements.
use Filament\Pages\Auth\Login;
use Filament\Http\Responses\Auth\Contracts\LoginResponse;
use App\Models\User;
use Rawilk\ProfileFilament\Auth\Multifactor\Enums\MfaSession;
use Rawilk\ProfileFilament\Auth\Multifactor\Events\MultiFactorAuthenticationChallengeWasPresented;
use Rawilk\ProfileFilament\Auth\Multifactor\Facades\Mfa;

// shown below
use App\Responses\TwoFactorResponse;

class YourLoginPage extends Login
{
    public function authenticate(): ?LoginResponse
    {
        // rate limiting logic...

        $data = $this->form->getState();
        $user = User::whereEmail($data['email'])->first();

        if ($user->two_factor_enabled) {
            // verify password is correct before redirecting...
            Mfa::pushChallengedUser(
                user: $user,
                remember: $data['remember'] ?? false,
            );

            return app(TwoFactorResponse::class);
        }

        // Handle auth like normal...
        if (! filament()->auth()->attempt($this->getCredentialsFromFormData($data), $data['remember'] ?? false)) {
            $this->throwFailureValidationException();
        }

        // ...

        return app(LoginResponse::class);
    }
}
As you can see, this is a very basic example. You will need to make sure you are verifying the user is found, the user's password is correct, and anything else required by your application before you redirect to the two-factor challenge page. If the user doesn't have mfa enabled, you can just handle the auth like normal. You can look at the base login class for how filament handles it if you need to.
One of the most important things to take-away from this, is that if the user does have two-factor enabled, you need to push their id into the session so our mfa challenge page can identify them later.
We are using the pushChallengedUser method on the Mfa facade in the code above to record the user's id in the session for our two-factor challenge to use later.
To redirect to the two-factor challenge, you will need a custom response class, like this:
namespace App\Responses;

use Filament\Http\Responses\Auth\Contracts\LoginResponse;

class TwoFactorResponse implements LoginResponse
{
    public function toResponse($request)
    {
        $panelId = filament()->getCurrentPanel()->getId();

        return redirect()->route("filament.{$panelId}.auth.mfa.challenge");
    }
}
Completing The MFA Challenge
When our mfa challenge detects you have a challenged user in the session, we will utilize Laravel's Pipeline to authenticate the user. This will allow you to define your own pipes that can be used to handle your authentication process.
By default, we provide the \Rawilk\ProfileFilament\Actions\Auth\PrepareUserSession pipe, which acts as the final step and handles logging the user in and preparing the session correctly, however you are free to use your own as well.
To define your own pipes, you can make classes that look like the class below. The only requirement is the class must have the handle method defined on it.
class MfaPipe
{
    /**
     * @param \Rawilk\ProfileFilament\Dto\Auth\TwoFactorLoginEventBag $request
     */
    public function handle($request, Closure $next)
    {
        // perform auth logic here.

        return $next($request);
    }
}
The $request that each pipe receives in handle is our custom TwoFactorLoginEventBag DTO object. This object contains the following properties:
\Illuminate\Contracts\Auth\Authenticatable $user: The user being authenticatedbool $remember: Indicates if the user wished to be rememberedarray $data: Any data submitted through our mfa challenge form\Illuminate\Http\Request|null $request: The current request object\Rawilk\ProfileFilament\Enums\Livewire\MfaChallengeMode $mfaChallengeMode: The current challenge mode (totp, webauthn)null|array $assertionResponse: If webauthn is being used, this is the response we received from the webauthn key
{tip} Your pipe classes don't need to verify the mfa method being used is valid; our mfa challenge will handle that for you.
In a service provider, you can register your custom mfa authentication pipeline like this:
use Rawilk\ProfileFilament\ProfileFilament;
use Rawilk\ProfileFilament\Actions\Auth\PrepareUserSession;

public function boot(): void
{
    ProfileFilament::mfaAuthenticationPipelineUsing(function () {
        return [
            YourCustomPipe:class,
            PrepareUserSession::class,
        ];
    });
}
Mfa Challenge
When either using the middleware, or your own authentication workflow, a user will be presented with a form to verify their identity with a second factor of authentication before they can proceed. Here is a screenshot of a challenge shown to the user when they have both authenticator apps and passkeys registered on their account:
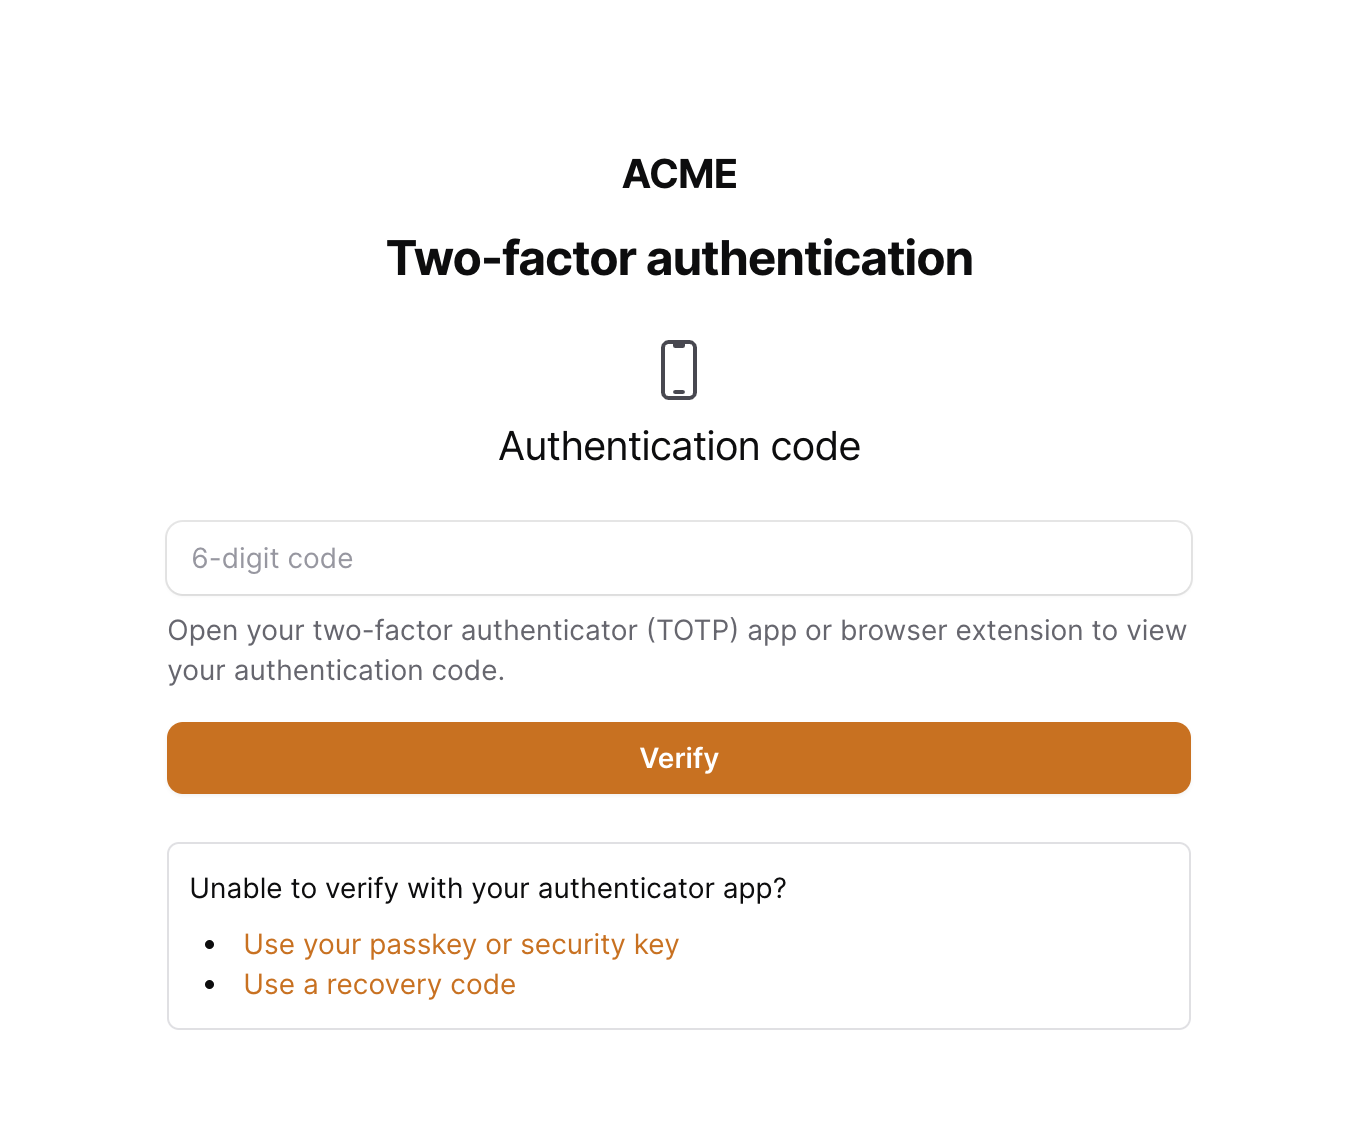
The challenge method initially shown to the user is determined by how the package resolves a user's preferred mfa method.
You typically won't need to override anything in the MfaChallenge page, except for maybe the view if you want to change the look and feel of the page. If the challenge detects an authenticated user (because of the middleware), we will confirm the user's mfa session, and then redirect to the home page of the panel. If there isn't an authenticated user, we will assume a custom authentication workflow, and send the request through any pipes as is described above.
Changing the Layout
If you want to use a different layout view than filament's default layout, you can specify it in a service provider:
use Rawilk\ProfileFilament\Filament\Pages\MfaChallenge;

public function boot(): void
{
    MfaChallenge::setLayout('your.layout');
}
Webauthn
Webauthn can be used as an alternative to totp apps as a second factor, however it can be more complex to set up sometimes. You'll need to make sure you read over the webauthn requirements and installation steps to make sure your application is ready for webauthn.
Configuration
There are several configuration options available for webauthn, however the defaults we have set should work for most applications. Here are the configuration options available in the config file:
// config/profile-filament.php

'webauthn' => [
    'relying_party' => [
        'name' => env('WEBAUTHN_RELYING_PARTY_NAME', env('APP_NAME')),
        'id' => env('WEBAUTHN_RELYING_PARTY_ID', env('APP_URL')),
        'icon' => env('WEBAUTHN_RELYING_PARTY_ICON'),
    ],

    /**
     * Attestation conveyance. This specifies the preference regarding the attestation
     * conveyance during credential generation.
     *
     * This shouldn't need to be changed in most cases.
     */
    'attestation_conveyance' => env('WEBAUTHN_ATTESTATION_CONVEYANCE', \Webauthn\PublicKeyCredentialCreationOptions::ATTESTATION_CONVEYANCE_PREFERENCE_NONE),

    /**
     * You can indicate if the authenticator must be attached to the client (platform authenticator i.e.
     * it is usually not removable from the client device) or must be detached (roaming authenticator).
     *
     * By default, we'll allow for both platform (passkeys included), and cross-platform (hardware security keys).
     */
    'authenticator_attachment' => env('WEBAUTHN_AUTHENTICATOR_ATTACHMENT', \Webauthn\AuthenticatorSelectionCriteria::AUTHENTICATOR_ATTACHMENT_NO_PREFERENCE),

    /**
     * You can indicate the user verification requirements (such as entering a PIN on a security key) during
     * the ceremonies with this value.
     *
     * By default, we use the default value used by Webauthn, which is "preferred". You can change this value
     * to be either "discouraged" or "required" as well.
     */
    'user_verification' => env('WEBAUTHN_USER_VERIFICATION', \Webauthn\AuthenticatorSelectionCriteria::USER_VERIFICATION_REQUIREMENT_PREFERRED),

    /**
     * With this criterion, a Public Key Credential Source will be stored in the authenticator,
     * client or client device. Such storage requires an authenticator capable to store
     * such a resident credential.
     *
     * Note: When set to "required" or "preferred", user verification will
     * always be required.
     */
    'resident_key' => env('WEBAUTHN_RESIDENT_KEY', \Webauthn\AuthenticatorSelectionCriteria::RESIDENT_KEY_REQUIREMENT_PREFERRED),

    /**
     * Timeout - the time that the caller is willing to wait for the call to complete.
     *
     * If the user verification is "discouraged", timeout should be between 30 and 180 seconds.
     * If the user verification is "preferred" or "required", the range is 300 to 600 seconds (5 to 10 minutes)
     *
     * Default timeout is 60 seconds (60,000 milliseconds)
     */
    'timeout' => 60_000,

    /**
     * Passkey timeout.
     *
     * Since passkeys require user verification, the timeout should be
     * between 300 and 600 seconds (5 to 10 minutes).
     *
     * We will stick with a default, lower-end timeout of 300 seconds (300,000 milliseconds).
     */
    'passkey_timeout' => 300_000,

    /**
     * Enable logging when webauthn attestation or assertion requests are made.
     */
    'logging_enabled' => env('WEBAUTHN_LOGGING_ENABLED', env('APP_ENV') === 'local'),
],
The relying_party is going to be the most often needed configuration option, however the defaults we set should work in the majority of cases. See The Relying Party for more information.
{note} The
relying_party.idshould be a full qualified url, i.e. https://your-domain.com, as we useparse_urlto get the domain for the id. You should also not use a subdomain for the id either, if possible.
{note} The domain used for the
relying_party.idproperty must match the current host name in the browser, otherwise webauthn will not work correctly.
Passkeys
Passkeys offer a simpler, userless sign-in option for a user. Once a user has a passkey registered to their account, they can use it as an alternative to the username/password + two-factor authentication workflow.
We provide a filament action, PasskeyLoginAction, that can be added to your login forms easily, however you will need to make sure you have a custom authentication workflow in place before you add the action to your login form. You will probably want to use the same authentication pipeline classes for this action as you are using for normal mfa.
{tip} Your authentication pipes don't need to worry about resolving the user from the passkey being used, as our action will handle that for you.
To add the passkey login action to your login form, you'll need a custom login class (you'll probably already have one if you followed the custom authentication workflow instructions above).
For this example, we'll use the same login class we created earlier.
use Filament\Actions\Action;
use Filament\Pages\Auth\Login;
use Rawilk\ProfileFilament\Filament\Actions\PasskeyLoginAction;
use Rawilk\ProfileFilament\Actions\Auth\PrepareUserSession;

class YourLoginPage extends Login
{
    protected function passkeyLoginAction(): Action
    {
        return PasskeyLoginAction::make()
            ->icon('pf-passkey')
            ->pipeThrough([
                YourCustomPipe::class,
                PrepareUserSession::class,
            ])
            ->extraAttributes([
                'class' => 'w-full',
            ]);
    }
}
{tip} The
PasskeyLoginActionis as customizable as any other filament action.
This will create a full-width button that will initiate passkey login when clicked. You will need to modify the login view (defaults to vendor/filament-panels/pages/auth/login.blade.php) to add the action to the form.
<x-filament-panels::page.simple>
    // ... {{ $this->passkeyLoginAction }}
</x-filament-panels::page.simple>
Here is a screenshot of what this could look like:
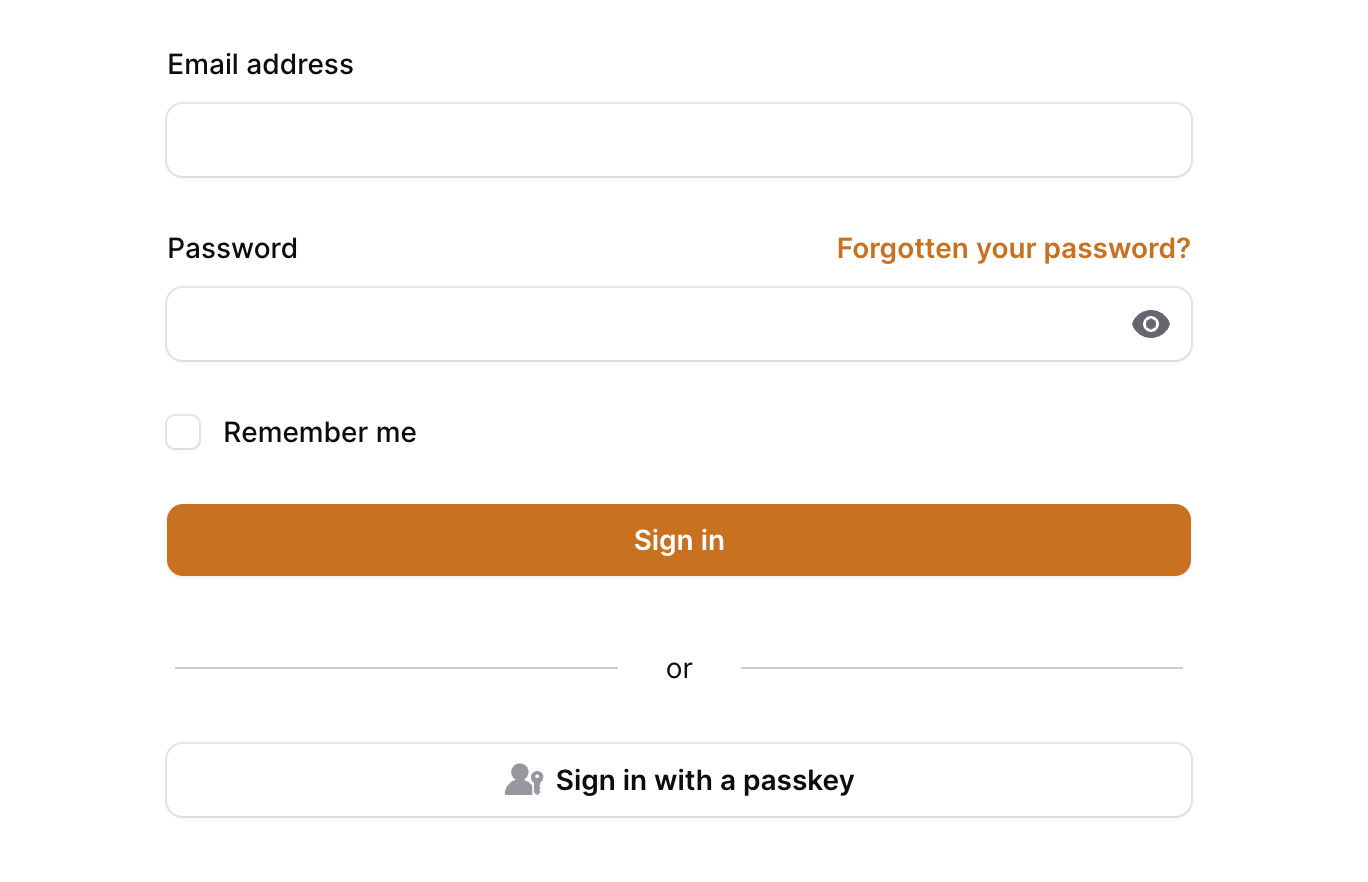
While publishing and modifying the login view from filament as shown above is a workable solution, it's generally not recommended to publish filament views. A better way to accomplish adding the passkey login action to the form would be to utilize the panels::auth.login.form.after render hook instead.
use Filament\Support\Facades\FilamentView;

FilamentView::registerRenderHook(
    name: 'panels::auth.login.form.after',
    hook: fn () => view('filament.hooks.login-after'),
);
Now just create the view being referenced in the render hook:
<!-- resources/views/filament/hooks/login-after.blade.php -->
<div class="mt-4">{{ $this->passkeyLoginAction }}</div>
Custom Passkey Auth Flow
If you need more control over how the user is authenticated when passkey login is used, you may define a custom callback using authenticateUsing on the passkey login action. The action will provide the passkey and the publicKeyCredentialSource object that was obtained from verifying the webauthn assertion. From there, you can log your user in and handle the redirect yourself.
PasskeyLoginAction::make()
    ->authenticateUsing(function (WebauthnKey $passkey, PublicKeyCredentialSource $publicKeyCredentialSource) {
        // Handle login and redirect here.
    });
Preferred Mfa Method
By default, we will use a user's first available mfa method registered them as their "preferred" method for authentication. This means that it will be the first method shown on the mfa challenge screen for the user.
If you want to give your users the option to chose their preferred mfa method, you can provide the package with a callback function that will be used to resolve the preferred method for a given user. You can register the callback in a service provider.
use Rawilk\ProfileFilament\ProfileFilament;
use Rawilk\ProfileFilament\Enums\Livewire\MfaChallengeMode;

public function boot(): void
{
    ProfileFilament::getPreferredMfaMethodUsing(function ($user, array $availableMethods) {
        return $availableMethods[0] ?? MfaChallengeMode::RecoveryCode->value;
    });
}
We will provide the callback the user instance, and an array of available challenge methods they have. Your callback should return a valid MfaChallengeMode case value. The $availableMethods received in the callback will contain MfaChallengeMode cases.
Changing When MFA is Enforced
When our RequiresTwoFactorAuthentication middleware is being used, we will check for a valid mfa session for a user that has mfa enabled on their account, except for when:
- The request is for the
logoutroute.
This may be fine for most applications, however there may be edge cases in your application. For these edge cases, you may provide a callback function to the ProfileFilament class in a service provider.
use Rawilk\ProfileFilament\ProfileFilament;

public function boot(): void
{
    ProfileFilament::shouldCheckForMfaUsing(function ($request, $user) {
        // ...

        return true;
    });
}
The callback you provide should return a boolean value, and will receive the following parameters:
$request: The current request object$user: The user to enforce mfa for